.png.58cfe414f117a5b917dfc7f637393e58.png)


Another weekend is upon us, and with it, a heap of changes to Speed Simulator, as well as a semi-new event. Let's check it out!

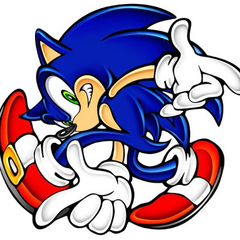
As you can see, this week's event is a rerun of a special exotic tier character - the fan-favourite Grind Shoes Sonic from Sonic Adventure 2 has made his grand return to Speed Simulator, giving everyone a chance to nab him. What makes this Sonic a particularly enticing reward is that not only is it a fan favourite that rarely returns to my knowledge, but his animations are entirely unique - replicating Sonic's gameplay animations from Sonic Adventure 2 to a tee. In short, if you're a fan of the Adventure era, you don't want to miss this.
Luckily, in comparison to the long grind that was ESP Silver's event last week, the missions required to get Grind Shoe Sonic is much simpler, and pretty easily done for even a newcomer. If you haven't already, feel free to check the previous guides as well for still running events. You can find the starter guide here, as well as a guide to unlocking Gemerl and Chocola here. You can also find a guide to ESP Silver's event in the link above.
Either way, enough rambling - let's get into the event.
Task 1: Complete Races - REWARD: 2x Tuxedo Chao
Our first task is a pretty simple one, and one you've likely done before. Still, we're going to go through it regardless, especially as there's two different avenues you can choose in order to tackle this, depending on what it is you want out of it.
The Set Up:
First things first, we're going to want to make it easier for us to even get races started to begin with. First things first, you're going to simply want to open up the Speed Simulator settings as seen here:

Then we're going to scroll down from there until we find a option called "race return destination". By default, this is set to bring you back into Green Hill Zone. You're going to want to change this to "Race World" instead:

From here, you're going to run over to Dadonpa, where you'll see a rocket behind him. Now go to the back of it, and you'll see "sneak in". This will bring you into race world.

From here, this is where your guide will now differ depending on what exactly you want out of this, but we'll cover both.
Route 1 - The Fast Way:
The fast way is plain and simple. You just want to get these races over and out of the way immediately so you can get this event done, and have SA2 Sonic in your box as soon as possible. In that case, you're going to go to your left once in Race World - where you'll see the drag race stand.

Drag Races are extremely short races that can be done within a few seconds, and feature you facing off against either Jet the Hawk or Metal Sonic depending on if you pick a foot race or a extreme gear race. In this instance, the type of race doesn't really matter due to how fast the races is. Just be aware the payout for winning will be extremely low. Either way, my personal preference is the No Place drag race in terms of sheer fastest race to finish. You might also find that the game decides to give you action races rather than drag races. So be certain you're in the right spot. The Drag Race courses are:
- Green Hill (On Foot)
- Hill Top (On Foot)
- No Place (Extreme Gear)
If you look to your left, it'll tell you which type of race you're starting, so if it says 'Action Race', make sure to switch it to Drag Race and pick your course.

Once you load in, you'll see the track is basically a straight line. You can essentially run through it in less than 30 seconds, with a payout of 12 tickets for winning. Either way, line up another drag race and you're done with this task.
Route 2 - The Race Shop Way:
The second route is longer, but if you want to chip away at multiple grinds at once, it's the better option for you. First things first, you're going to go to the far left where Dadonpa is, and run into him. He'll give you quests that are simple enough to do and will reward you with a 10 minute booster for race tickets, making payouts significantly higher.
Now, instead of going to the drag races stand on the left, you're instead going to action races on the right:

Like the drag races, the stand can glitch sometimes, giving you drag races despite you having hit action races. You'll know it's the right category since these are the playable stages:
- Emerald Coast (On Foot)
- City Escape (On Foot)
- Metal City (Extreme Gear)
- Green Hill Zone (On Foot)
- Metal Madness (On Foot)
Unlike the drag races, you need to pick a very specific race to run here, because the ticket payout to ratio of time spent playing the races is actually pretty good. In this instance, you specifically want to vote for Metal City, which is a extreme gear race against Jet. If it's not in the vote, do not vote for any level. Give it a few seconds and it'll reshuffle the stages available for you to vote on again.

You may have noticed there's specifically a portal on the left that goes to a Metal City race too, but this is specifically for Jet's unlock challenges, and also has a character mastery requirement to unlock, so just continue on with the action race stand for this.

This race in particular - if you hit the huge ramp shortcut at the end can be finished within 40 seconds, for one of the highest ticket payouts currently available in races, meaning it's pretty good for grinding out race tickets to spend on the current rotation of characters. Finishing races here will also work towards dark matter energy for the Shadow Android events, and you can hit air capsules in Metal City to contribute towards that world's unlocks too.
Either way, you'll now have the first task done. Let's move onto the second task.
Task 2: Earn Rail Grind Points (104,000 required) - REWARD: Sonic Blur Trail x2
This is another fairly self-explanatory one since rail grinding is one of the game's basic mechanics. With that said however, for a start - ensure you've unlocked Chocola from the Chao School event since that will give a event bonus that will cut the amount required in half.

From there, the best place to get these points is going to essentially largely depend on exactly where in the game you are and what worlds you have unlocked. So we'll run down the best grind rail spots in order based on how effective they are vs how far you need to be to have them unlocked.
Location 1 (MOST RECOMMENDED) - City Escape:
City Escape is essentially my go to when it comes to any kind of rail grinding challenge. That's because not only is the world so heavily made up of rails, as you'd expect from the level that introduced them to the series, but certain rails on top of that are made into a full blown loop, which means when you jump onto them, you'll essentially be able to automate this process, easily allowing the game to chalk up the neccessary points. One such location is literally found immediately straight on from where you spawn into this world:


Just jump on and you'll go in a loop around this area. It's as plainly simple as that. The issue is City Escape after a recent update now requires a whopping 65 mastery level to access, which is not remotely beginner friendly, so we need to find a alternative spot.
Location 2 - Hill Top Zone:
While not as effective as City Escape, Hill Top Zone is also fairly easy to unlock and has some pretty long grind rails that you can pretty easily get away with grinding on for awhile to rack up points, even if it'll require more leg work. From the spawn point, simply go right, and next to the Neo Metal event, you'll find a bridge with train tracks on it:

This isn't a full loop, but it is a fairly long rail that will net you around 10k-15k grind rail points per grind. So simply jump on, hold boost, let it do it's thing, and then proceed to jump back on once you reach the end and repeat the process. It'll still take around 10 or so tries to do it, but it'll get done pretty quickly, all things considered.

Alternatively, there's another loop here that technically counts as a loop - however I don't recommend it as it brings you onto a spring that disconnects you from the rail, meaning it's not really automated, therefore still requiring your oversight.
Location 3 - New Yoke City:
The least effective of all of these frankly, but still decent if you just want to do this immediately as soon as you can. From the spawn point of the world, run up the stairs towards Nine and Resistance Knuckles. Behind them, you'll find a large statue of Mr. Dr. Eggman, and a series of rails planted all around this small area.

Simply jump onto the rail of your choosing, and let it go, although it's probably best not to use boost here as the rails are in close proximity of each other, but are also very short, meaning it's easy to use boost and accidentally send yourself shooting off away from the rails.
This is not super effective due to how short the rails are, but with how many are dotted around this area and in relative ease to jump on them, this is probably your last best bet for how early you can do this without just using regular grind rails for short trips. Either way, depending on which method you've used, you'll have earned your trails, and now can move onto Task 3.
Task 3: Collect 104 Sky Rings - REWARD: 3x Tuxedo Chao:
Frankly? This is far and away the easiest task of all of these, and it's all thanks to a new addition from a few updates back. For this one, we're going to be heading to Emerald Hill, and going to Tails' workshop, where you'll find the Tornado Assault warp ring.

As luck would have it, flying through sky rings is quite literally a mechanic for this minigame, and that means the stage is absolutely littered with them. Just keep an eye out as you fly around and you'll see them pop into view:

In my experience, this is far and away the easiest means to get Sky Rings, requiring very little effort and being over within two minutes. Even with the most casual of effort, it's pretty easy to get anywhere from 64-67 sky rings in one playthrough of the minigame.

Even better - if Chocola is equipped, one playthrough of this mission with 52 Sky Rings is enough to completely finish the mission in one run, giving you your other three Chao, and letting you move to the next task!
Task 4: Level Up a Friend 24 Times - REWARD: 3x Sonic Blur Trails:
Another relatively easy mission, albeit one you're going to need to have a fairly decent amount of rings and red star rings to accomplish. All you want to do is head to Green Hill Zone, and run to the friend upgrade machine.

Once here, the game is basically asking you to get a Chao or Fast Friend to max level. In this instance, I recommend ensuring you have Chocola maxed if you haven't already done so. However, it doesn't really matter which Chao gets the upgrades, so if you want the cheapest one possible, simply get a common Cyan Chao from the vending machine in Green Hill.

As you can see, Cyan Chao have extremely low costs for upgrading, although even to still get to max level, it'll grow in cost. In total, you'll need to ensure you have:
2,713,801 rings
15 Red Star Rings
Of course, if this seems to be too much, you can always opt to get multiple Cyan Chao and level them up to Level 5 to cut down in costs, but given how easily it is to get that amount of rings via auto-run, I'd just recommend getting that amount so you can simply spam through the upgrade process.
You'll get your blur trails, and possibly Cream the Rabbit if you haven't unlocked her already, and you'll be able to move into the final step of the event.
Task 5: Destroy 104 Badniks - REWARD: Extreme Gear:
For the final task of the event, it's simple - all we need to do is destroy badniks in any world. For this one, we're going to go to Emerald Hill, where you'll have two options. One that's significantly faster - assuming you did the ESP Silver event last week - or have any kind of flying mount, or another option if you don't have a flying mount. Either way, we'll cover both.
Option 1: Tornado Time (RECOMMENDED)
This one is extremely simple - Emerald Hill Zone has two unique quailities to it. It's not only littered with heaps of badniks all around the area, but it's also one of the most open zones in the entire game. So what you're going to do is simple - you're going to ensure you have a flying mount equipped (The Astral Tornado is still available as a free reward via ESP Silver's event), and you're going to equip it.

Flying mounts are equipped with long range weapons, and can lock onto enemies, so what you're going to do is simple - just fly around the area, pelting any badniks you lock onto, and this will be a immense breeze to pull off, especially with Chocola equipped, providing a event buff and halving the amount of required badniks down to 52.
Option 2:

If you don't have a Tornado, you're just going to have to do this the old fashioned way on foot, which isn't so bad because as mentioned - Emerald Hill is filled with enemies, usually moving in packs of three or four. Pretty much anywhere you run to will have badniks along the main paths. So just keep running around these paths, making a loop around Tails' workshop and destroying enemies as you go.

Another good spot is down where the waterfalls are, as you'll see chompers sitting in the lake that you can easily homing attack chain along your way. By the time you get back to the spawn point, the badniks will have respawned, allowing you to repeat as often as necessary, although frankly you'll likely find enough on your first loop around the zone. If you have either Neo Metal Sonic, Super Sonic, or ESP Silver, it's also worth switching to them, as they can destroy enemies by boosting into them.
Conclusion:
With all five tasks done, you'll see a red dot next to your character selection, indicating that you've officially finished the event, and you'll also gain 2,000 red star rings for the trouble, which is just perfect since the store also refreshed with 5 event characters for you to nab as well, perfect for boosting character mastery.

Go ahead and equip your new character! Grind Shoes Sonic is personally one of my favourite characters in the entire game, so I think he makes a pretty awesome addition to anyone's collection.

As you can see, Sonic's animations are also pretty in-sync with his SA2 animations, from running, jumping, and even his idle pose being his starting animation for a 2 player race in Sonic Adventure 2. He even does the old school Light Speed Dash charge up sound effect from Sonic Adventure if you hold the spin dash button!

All around, I think the amount of detail that's gone into nailing that specific era of Sonic to give him differences from other variants and give off some great fan-service is just wonderful.
As usual, I really hope this guide has managed to help everyone make this event significantly easier for them, and as always, I greatly appreciate all of the support these guides have been getting. Feel free to leave feedback, or even just a like if you want.
Grind Shoe Sonic isn't the only thing added in this update. Check out this article to learn more about other characters that can be obtained this week!
I'll see everyone again next week for the next event guide!
Failinhearts
-
 1
1


")

Recommended Comments
Create an account or sign in to comment
You need to be a member in order to leave a comment
Create an account
Sign up for a new account in our community. It's easy!
Register a new accountSign in
Already have an account? Sign in here.
Sign In Now